Disclaimer
We may earn a commission when you use one of our coupons/links to make a purchase at no extra cost to you. Please support the site by using the links.
Now that the head was all done, I had to decide on what intake manifold to run and what exhaust. I got a laser-cut flange with the head in case I decided to build my own headers. I got a partial intake manifold for the 20 valve head. The plenum section was machined off. So it was basically only the section that bolts onto the head with a small piece of the runners.

What was really nice as I got the standard fuel rail with the head and the intake manifold. I was really keen on keeping the throttle bodies as it made the engine so much more responsive. I may make the project a bit more difficult but who has ever been scared of a big project.
As the Polo was still running and I could not strip anything off the car for the build, I went to the shop that sold me the previous set of throttle bodies. Luckily they had another set and the price wasn’t that bad. At this stage, the Toyota throttle bodies were getting scares. Luckily the guy who sold it to me didn’t jack up the price.
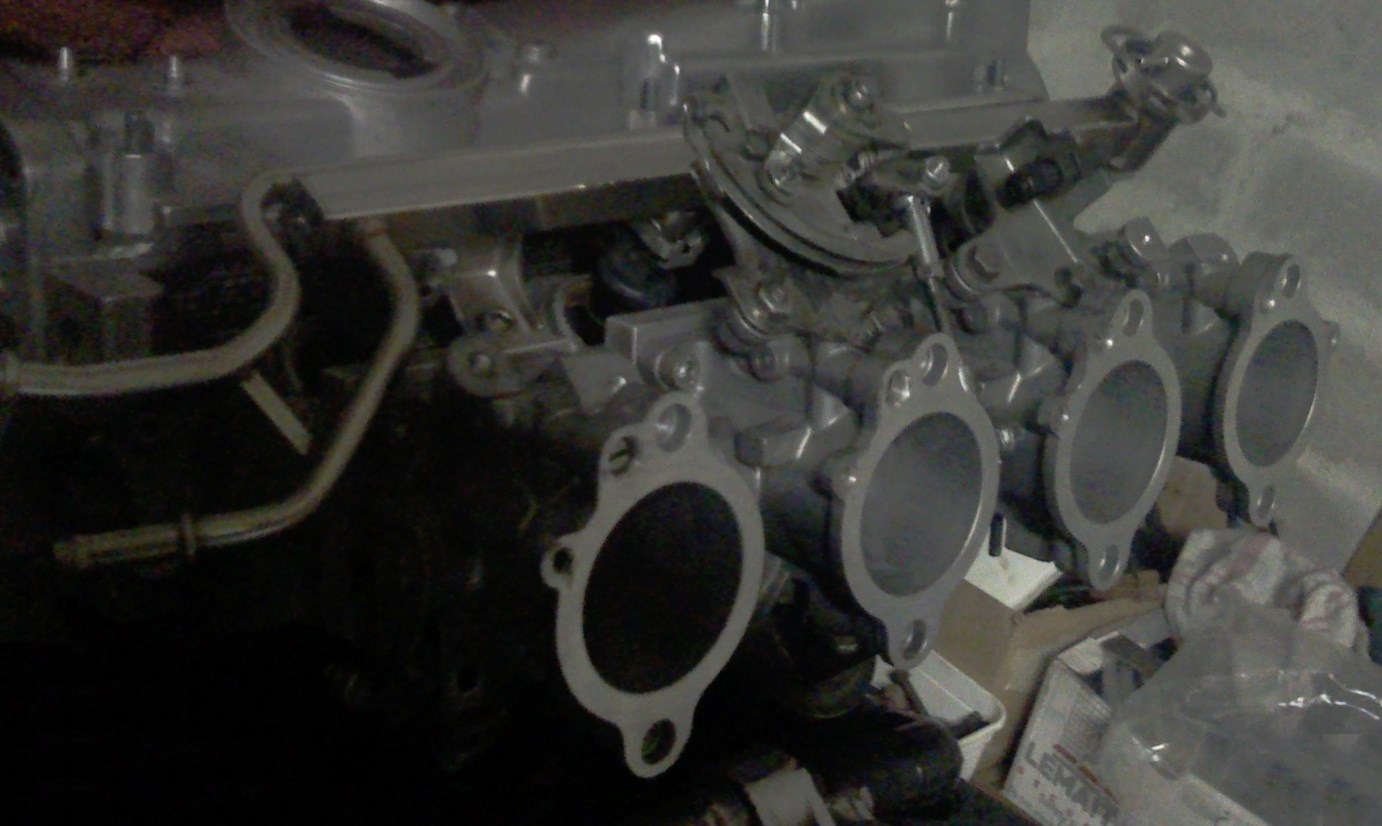
Making an intake manifold…
Now I had a partial intake manifold and throttles. I took the standard intake and machined the runners off at an angle so that I could machine an adapter part that I could then just weld to the intake again. I designed the parts on our 3D CAD software at work and then machined them after hours.

This was a bit of a time-consuming part to make and there were 4 of them. I first turned the blank on a lathe and then machined the flange detail in a conventional milling machine. Now I had four adapters and a machined intake manifold. I was a bit worried about the parts not being straight on the manifold and the throttle shafts not lining up properly. I designed a 10-millimeter thick mild steel flange that I could bolt the 4 adapter parts into. This meant that they would be lined up properly and the mild steel plate was nice and thick so that the assembly could not pull that much when welding them. Aluminum is one of these materials that I like to pull when welding.

So now I only had to weld the parts together. First I tried to tig weld on another piece of plate as I didn’t want to mess up my parts. I attempted to weld the manifold once I got the hang of it. I wasn’t as easy as welding the clean plates. The problem was that the manifold was a cast part which means the aluminum is not that clean. I eventually got it welded properly and it looked really good. I didn’t need to grind any welding to make it look good.
This worked put well!


The intake was now welded, all I had to do was clean up the ports of the manifold. Luckily everything works out nicely. There was more than enough meat in the inside of the manifold to blend in the adapter part. You could not even see where the join was. I took a piece of 80 grid emery paper and smoothed out the bumps and cleaned it up nicely. I went through the complete process with the head. Smooth out and polish the ports so that they suite the head.

I was really happy with how the intake manifold turned out. Next, I dummy assembled the Toyota throttles to the manifold and the manifold to the head. This just worked out really well!

Next was to figure out what I am going to do about the exhaust. This was round about the point when Volkswagen launched the 1.4-liter TSI engines for the VW Polo GTI. These TSI engines were Supercharged and turbocharged. This was a really intriguing concept as it would work really well on my Polo. I could fit a big turbo on the motor and use the supercharger to help spool the turbo. You can get the best of both worlds. Low down boost from the supercharger which eliminated all lag and a nice big turbo to make big power. This would be the ultimate setup if I could get it right. And so I started doing some research around the concept…
« So what spec cylinder head to get? | Dropping engine compression ratio? »
Check out these link buttons!
Parts by Brand Support the website by becoming a Patron Make a donation with GoGetFunding Click here if you would like to Subscribe! Click here to check out some of the other posts Click here to make a contribution to my latest Project car Click here to setup a monthly contribution to website Click here to check out the forum page Click here to check out the Top 100 Auto Blogs
